Follow these instructions to configure your Okta account to connect to WhosOff for single sign on purposes.
PRE-REQUISITES:
- You will need to have administrator access within your Okta account
- You will need to have an existing account on WhosOff
- You will need to be a registered super user on your WhosOff account
SUPPORTED FEATURES:
The Okta/WhosOff SAML integration currently supports the following features:
- IdP-initiated SSO
- SP-initiated SSO
For more information on the listed features, visit the Okta Glossary.
Configuration
1. FROM WITHIN YOUR OKTA ACCOUNT
- Login to your Okta account
- Ensure you are in the Administration area
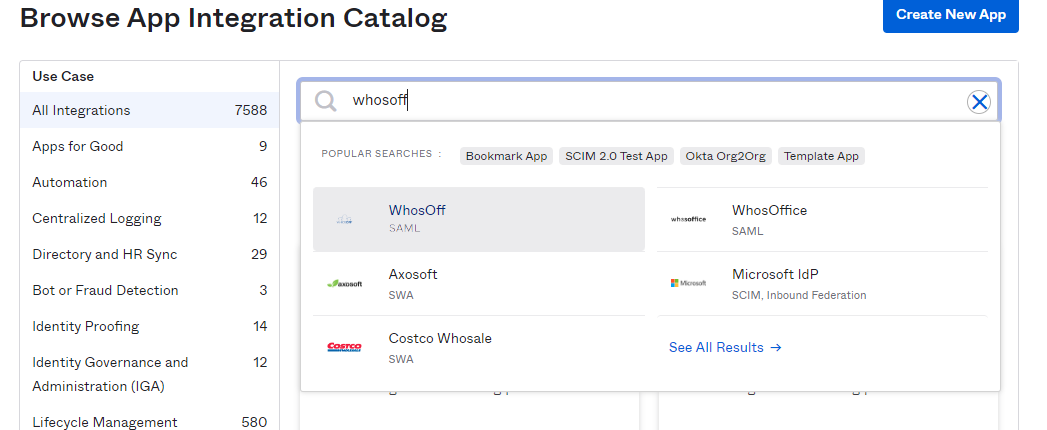
- From the resulting screen, click Browse App Catalog
- Search for and click on WhosOff in the application directory
- Click on Add Integration top right.
2. FROM WITHIN YOUR WHOSOFF ACCOUNT
- Login to your WhosOff account
- Click Administration on the left hand menu
- Click Admin dashboard
- On the right of the resulting page, click Company settings
- Click on the Single Sign On tab (left hand side)
- From the SSO provider drop down, select Okta and click on Activate SSO.
- Once activated, make a note of the Integration GUID, or copy it to your clipboard as it is required for the next step.
3. REGISTER THE INTEGRATION ID/GUID
- Log into your Okta account
- Ensure you are in the Administration area
- Navigate to Applications then click Applications on the left-hand navigation menu
- Click on the WhosOff application
- Under the Sign On tab, under Advanced Sign On Settings, input the Integration GUID from the previous step into the Integration ID field.
4. DOWLOAD YOUR METADATA FILE
- Once the connector has been added to your account, you will then need to download your SAML metadata file
- Still from the Sign On tab, scroll down to the SAML Signing Certificates section
- Inline with the current active certificate, click the Actions menu, then right click "View IdP metadata" and click "Save link as..."
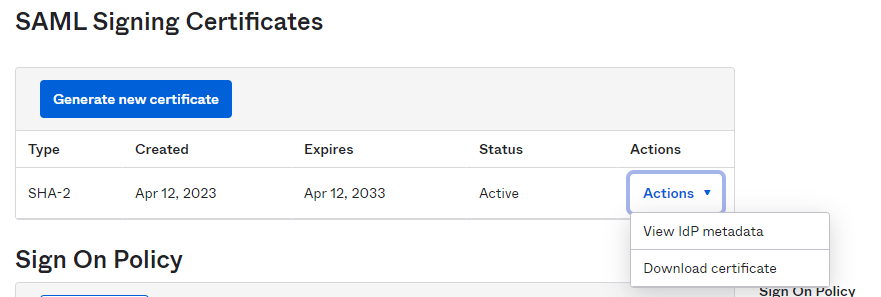
You will then be able to choose where to save the metadata file on your computer, which you will then need to upload to WhosOff within the next steps so make sure you know where this file is downloaded to.
5. COMPLETE YOUR CONFIGURATION
- You will be prompted to supply your Meta Data file
- Click on the Choose file button to locate the file you downloaded earlier
- Once located, click on the Upload button
- If successful, you should receive a confirmation that looks like the following:
- Click on OK, then on Save changes.
Note: If you would like to force users to Authenticate through Okta, make sure "Force SAML" is selected as "Yes" then click on Save Changes.
If you require any assistance whilst setting up your Okta SSO integration with WhosOff, drop our support team an email.
SHARE
Similar articles
How to setup Auth0 SSO
Companies using the Auth0 service can integrate their WhosOff, for Single Sign On purposes.
How to setup Azure SSO
Companies using the Azure service can integrate their WhosOff, for Single Sign On purposes.
How to setup OneLogin SSO
Companies using the OneLogin service can integrate their WhosOff, for Single Sign On purposes.
Active Directory setup
This article explains how to setup/configure your local server to integrate with WhosOff in order for your Active Directory users to access their WhosOff account without the need for separate login information.
How to setup Google Single Sign On (SSO)
Use these instructions to configure your Google Business Apps with WhosOff for single sign on.
How to setup a custom SAML app in Google Workspace
Companies using Google Workspace can integrate their WhosOff account, for Single Sign On purposes.